Search Results for "facebook groups"
Support your Business with a Raving Facebook Group
Posted by: | CommentsAccording to announcements by Mark Zuckerberg of Facebook; groups are where you are going to get the most visibility and interaction. In this post, I will walk you through the process of setting up a Facebook group from scratch. To ensure you can support your business with a raving Facebook Group.
Let’s get started and create a Facebook Group
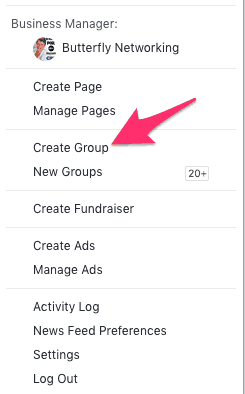
Log into your Facebook Personal Profile
Go to the top right and click on the down arrow and select “create group”.
![]()
Name your Facebook Group
You definitely want to think about the name of your group. Do you want your group to be found in the Facebook search? If so you’ll want to be sure to use keywords in both your group name and description.
Depending on the purpose of your group you have a number of different options for your name.
- Brand Name
- Company Name
- Product Name
- Service
- Common Interest
- Brand with Location
- Company with Location
- Product with Location
- Service with Location
- Common Interest with Location
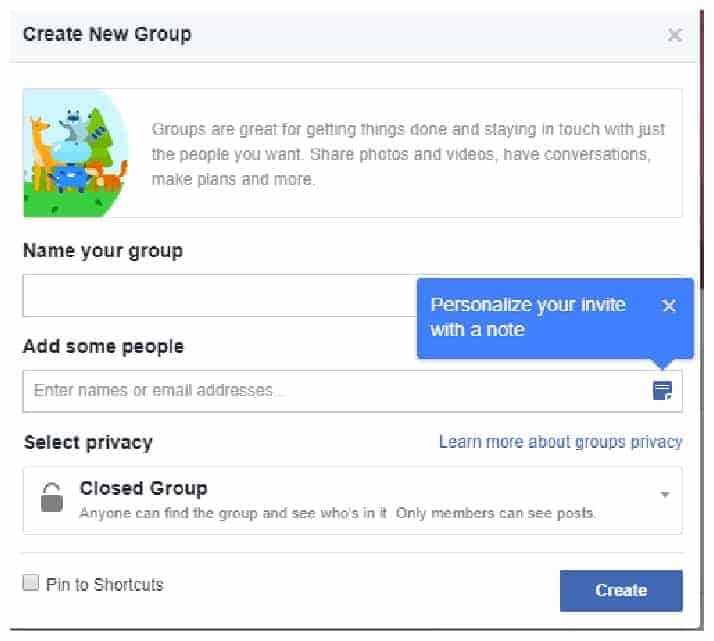
Invite a few customers, clients and friends
Enter a few names of people you know will likely come and join your group. You may want to ask people you know who will be helpful in assisting you in establishing your new group.
Select Privacy
Facebook offers three options for privacy, they are;
- Public – Public groups are open to anyone to join. This is a great option for lead generation. You will be able to create posts that highlight your expertise and use it as a tool to move people over to your paid products and services. Encourage members to post in the group but only if they follow your guidelines. Control remains in your hands and can remove people who don’t follow your rules.
- Closed – With a closed group anyone can find the group but they have to be approved before they can join. The keywords you used in your name and description will be important here if you want people to find the group. You can also make a closed group one that people have to pay to join, I personally
 belong to a few. If you do this be sure to fill in the description with directions on how to become a paying member. If they find you when searching it’s in your best interest to let them know how to join.
 - Secret – Secrets group will not be found in a search, only your members can find and post to the group. This is a great tool when you are working on something that you definitely do not want out there for general consumption. If you were a personal development coach with a group program this might be the perfect setting to share that very personal information.
Once you complete those three steps your group will be created. Next is to fine tune the details and add the content you want to be found for.

Edit Facebook Group Settings
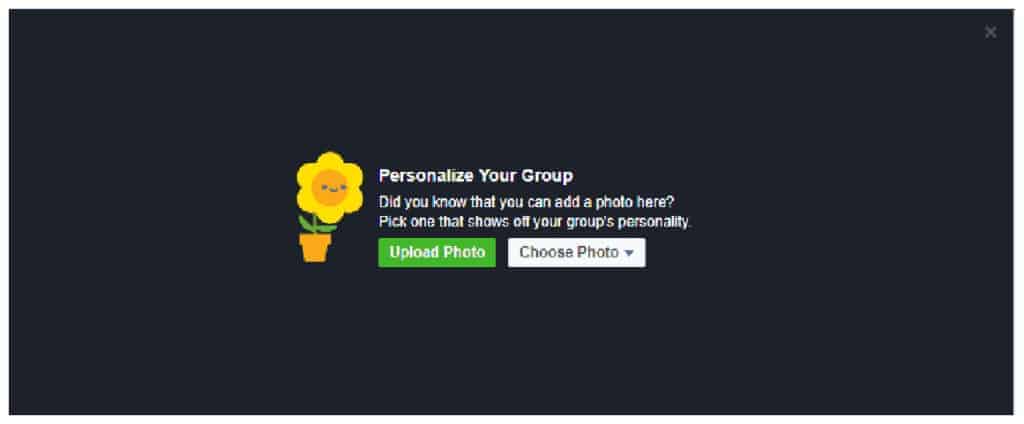
The cover graphic can be used to explain what your group is all about, just be beautiful graphics and anything in between. These can be easily created using free programs like Canva or GIMP.
Really successful Facebook group can be found on Facebook. Completing all of the sections here on the setting page makes it MUCH easier for people to find you organically if you are creating an open group.
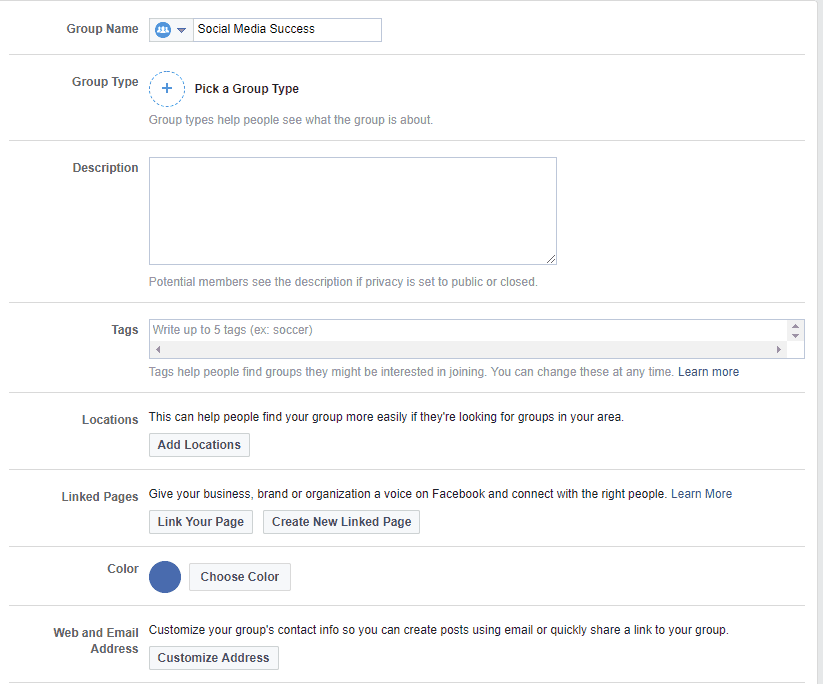
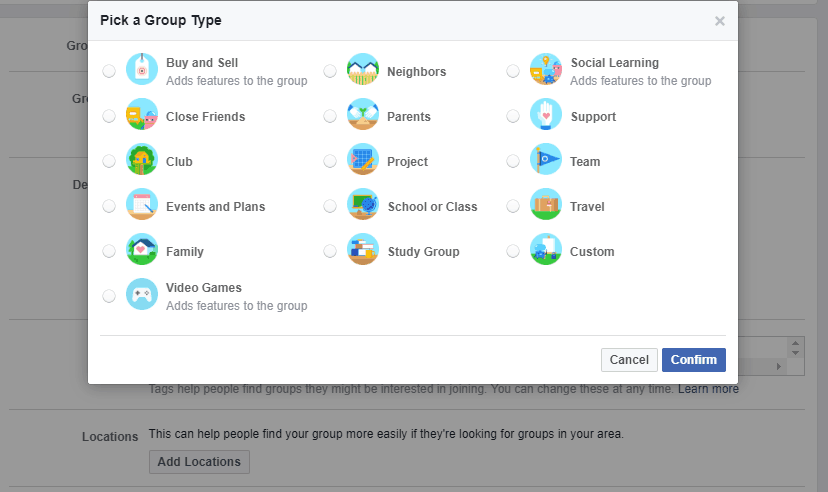
Carefully select the group type that is appropriate for your specific group because this will also assist people when searching on Facebook
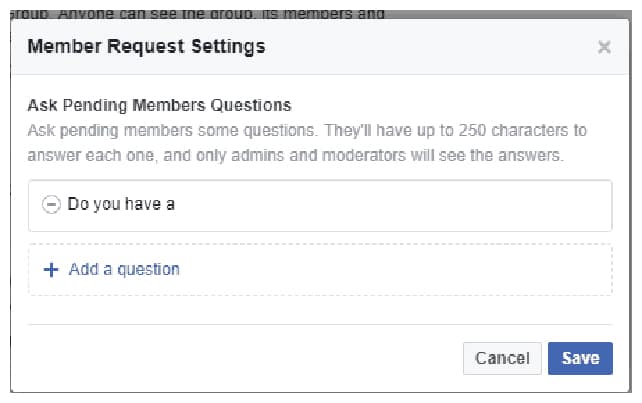
Be sure to ask Ask Pending Members Questions – This will allow you to screen any new membership requests. Previously in order to ask questions, you would need to friend the person or send them a Facebook message, ask the questions and then manually keep track. A whole lot of work! With the built-in questions, you no longer have to indiscriminately add people who request membership. You can now approve them based on their answers and hopefully keep out anyone who may abuse your group.
Manage your Facebook Group
Once you have everything set up it’s time to Run your Facebook Group
Introduction – Most noteworthy, let people know what your group is all about. Be sure to provide enough information to allow potential members to make that informed decision about joining your group. This will be visible in the right-hand column of your group.
Rules and guidelines – To run a productive and clean Facebook group, it is important to outline what is acceptable and what is not. Outline to your new members what is acceptable. Be sure to post your rules where your members can easily see them. In my experience simple is best, many of the groups I belong to only have 4 rules. You can check out all the rules in the groups to which you currently belong, to find them follow the graphic below.

Respectful – Treat others with respect and monitor your group to ensure members are treating each other with respect.
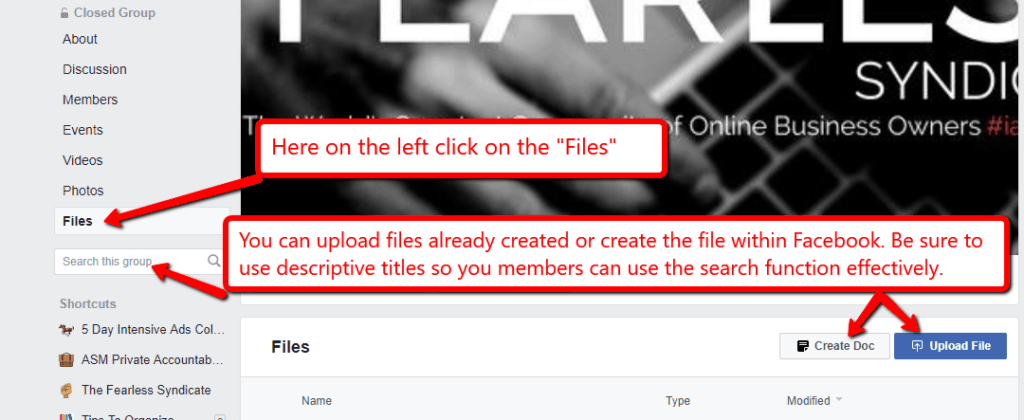
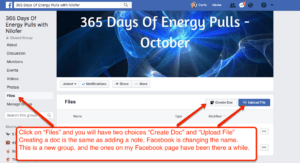
Make it easy to consume – My personal pet peeve. 🙂 Your group newsfeed will not remain in chronological order and can become confusing for your members to find specific posts. When specific posts are important to your members you may want to use the “File” function to create a list of the most important ones. Members can also add files to add to the value of your group.
Engage regularly – This one is critical, like everything in life you get what you put into it. Test setting the notifications for your group so that you receive notifications for all posts and comments. It may be too much for you, this will depend on the size and activity level of your group, you will have to find your specific comfort level. Add admins to assist when your group gets rockin’ and rollin’!
Check out my previous post on Facebook Business Groups
How to Find Customers and Clients With Facebook
Posted by: | CommentsThe one trick that makes it easy to find customers and clients with Facebook is to know exactly who your ideal client is. This can be uncovered a couple of different ways.
- Ask your current customers and clients their likes, dislikes, hobbies, habits, etc. You likely already know quite a few facts about them like where they live, married/single/divorced, children, job, career or business.
- Do some digging on Facebook, you can find out many different things about people when you look into what they like, follow, share and participate in.
Use Facebook Search
Facebook Search has many search options available. You can search for for people, posts, photos, places, Pages, Groups, apps and events.
These different options can be used to uncover customers and clients for you. Test out a couple of generic searches and see what shows up for you. With Facebook’s algorithm based on each individual’s personal profile each person will see something different.
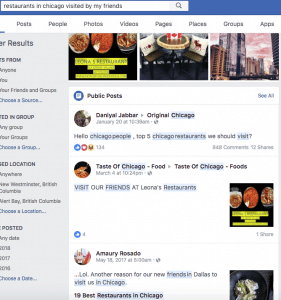
But you can get even more specific too: try “Restaurants in Chicago visited by my friends” or “Places in New York visited by people who like Mari Smith”. I’m sure you can think of more along those lines!
To find customers and clients on Facebook use the magnifying glass to the right, search for keywords related to your business, and click on “Public Posts,” to see what people are complaining about. This could be the perfect avenue to find people who are looking for the solution your business provides.
 Another great search that works well if you are friends with your customers and client on Facebook is to run a search for “Friends of my friends who live in New York, New York”. Of course you can swap out the city for any location in the world. Works great if you are travelling and would like to meet a few new people in each city you visit.
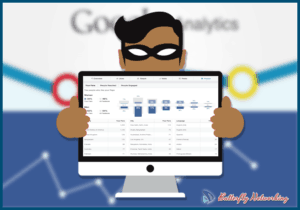
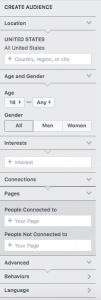
Facebook search is more powerful than most people realize. Once you start running ads and or promoted posts you will see the targeting options that are available to you. Check out the graphic on the right.
You can also search by likes, interests, times and other categories.
When you find people you would love to have as clients and customers you can add them to a Facebook list so that you can keep track. To look at your Facebook lists go here https://www.facebook.com/bookmarks/lists.
Use Facebook live!
When you use Facebook live it doesn’t have to be polished and professional – it just needs to get people’s attention. Contact people who watched your Facebook live presentation you can use information from their Facebook profile to find common interests and personal tidbits.
Learn how to use Facebook live like a pro with Facebook Live Mastery.
Tips on Maximizing Facebook Tools
Posted by: | Comments
Want to add more polish to your Facebook Live broadcasts?
Wondering how Facebook Creator can help?
Facebook Creator is a handy all-in-one app that lets you record branded video, chat with your community, and get valuable insights for your content.
In this article, you’ll discover how to use the Facebook Creator mobile app to get the most out of your Facebook Live videos.
Read more: How to Use the Facebook Creator App via Social Media Examiner

So, you’ve built a social media marketing foundation. That’s great, but let’s take things to the next level.
Today, we’re going to outline some simple, effective ways to help improve your Facebook performance to get more followers, build engagement and drive traffic to your website.
To begin, let’s start with goals.
Read more: How to Get More Facebook Followers and Improve Engagement via Social Media Today
Do you have a Facebook group for your business?
I’m not talking about your Facebook PAGE, although that’s super important too!
I’m talking about Facebook groups, which are now being used by 1 BILLION people each month.
Facebook groups are a fantastic way to provide value to your audience, while growing your traffic, email list and sales.
They provide a more personal, interactive environment where you can:
– Give advice on common problems or issues related to your industry
– Become a trusted expert in your field
– Connect your customers or clients with one another
– Promote your stuff: blog posts, products, services – you name it!
– But while Facebook groups can be amazing brand-building tools, getting people to actually JOIN them can be a challenge.
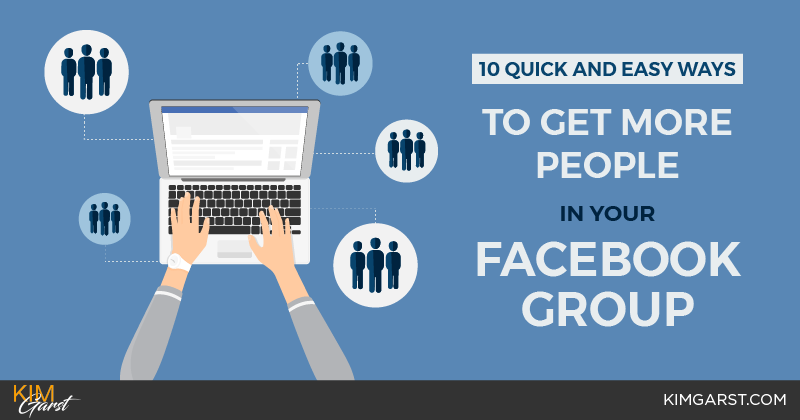
This post will outline 10 quick and easy ways you can start growing your Facebook group today!
Read more: 10 Quick and Easy Ways to Get More People In Your Facebook Group via kim Garst
How to Use Facebook Notes for Business
Posted by: | CommentsHave you ever considered using Facebook Notes for Business? Recently I joined a paid Facebook group and I realized that one of the ways I could be helpful in the group was to add some “how to” information. At first I simply did a post but I saw that it soon disappeared down in the timeline. (it’s a very active group) Not one of the new people joining the group would see they could enhance their experience with the group with the simple strategy I shared. I went searching for a better way and remembered Facebook Notes.
It appears Facebook is changing things up and for some pages and Facebook groups they are no longer called notes. They are now called docs instead. Which I believe is a good thing as so many people already use the word docs! It’s nice when things match up and are called the same thing on many different platforms. Would you agree?
I discovered no specific purpose designated by Facebook for notes, so that pretty much leaves it open for us to make it work the way we need it to work. Here are a few suggestions:
6 Ways to Use Facebook Notes/Docs for Business
- use it as an extended business description
- press releases
- company updates
- special offers
- Events
- instructions to complete a task
If you do not have Facebook notes/docs added to your page or group, it’s nice and simple to do;
- Go to the Facebook Page you want to add the Notes to
- Under the cover photo you’ll see various actions
- Click on the “See More” dropdown and the option for “Notes” will appear, along with other options
Use Facebook Notes to Promote Your Blog
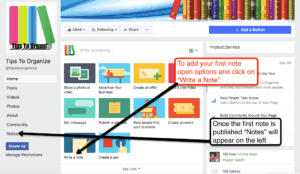
I like to share content from the Butterfly Networking Blog, because of course it’s always good to spread your own content around! Sharing my posts in Facebook Notes is just another way to do the work once and benefit multiple times. 🙂 Then I like to link back and forth between note and blog post. You will notice on the Butterfly Networking Facebook Page notes section we usually link right back to the blog. I personally like to put a teaser for my blog posts in a note and then link it back to the full blog post. You can do that too, or something totally different. That’s the beauty of notes, there are lots of options.
One way to enhance your notes and or docs is to add photos, here are the directions from Facebook
To add a photo to your note:
1. Open the note
2. Click Edit Note in the top right
3. Click where you want to add the photo
4. Hover over on the left, then select Photo
5. Choose a photo from the list or click Upload New Photo to add a new one
To remove a photo from your note, hover over the photo and click Remove.
To change a photo’s position in your note:
1. Open the note
2. Click Edit Note in the top right
3. Hover over the photo
4. Click Left, Center or Right
To manually resize a photo in your note:
1. Open the note
2. Click Edit Note in the top right
3. Hover over the photo to make appear on the left and right
4. Hover near to change it to
5. Click and drag to resize the photo
How do I add or remove a cover photo in my note?
To add a cover photo in your note, click the gray area at the top. Choose a photo from the list or select Upload New Photo to add a new one.
The recommended cover photo dimensions for a note are 1200 pixels (width) by 445 pixels (height). If you upload a smaller photo, it’ll stretch to this size and appear blurry.
To remove a cover photo in your note, hover over the existing image and click Remove.
Remember FB is always improving and editing their platform I would definitely advise against using it for “blog posts”. You never know you could wake up one morning and the function would be gone or dramatically changed.
Check out my best selling product Facebook Set Up Like a Pro ==> http://clickherenow.co/FacebookPage We will be switching in the near future to a new membership site and the price will be going up.